Amazon Linux AMI : Let’s Encrypt : ImportError: No module named interface

Let’s Encrypt has only experimental support for the Amazon Linux AMI, so it’s kind of expected to have issues once in a while.   Here’s one I came across today:

# /opt/letsencrypt/certbot-auto renew
Creating virtual environment...
Installing Python packages...
Installation succeeded.
Traceback (most recent call last):
File "/root/.local/share/letsencrypt/bin/letsencrypt", line 7, in <module>
from certbot.main import main
File "/root/.local/share/letsencrypt/local/lib/python2.7/dist-packages/certbot/main.py", line 12, in <module>
import zope.component
File "/root/.local/share/letsencrypt/local/lib/python2.7/dist-packages/zope/component/__init__.py", line 16, in <module>
from zope.interface import Interface
ImportError: No module named interface

My first though was to install the system updates. It looks like something is off in the Python-land. But even after the “yum update” was done, the issue was still there. A quick Google search later, thanks to the this GitHub issue and this comment, the solution is the following:

pip install pip --upgrade
pip install virtualenv --upgrade
virtualenv -p /usr/bin/python27 venv27

Running the renewal of the certificates works as expected after this.

P.S.: I wish we had fewer package and dependency managers in the world…

PHP Package Development Standards

Paul M. Jones announces the availability of PHP Package Development Standards for review:

This initiative researches the PHP package ecosystem to recognize commonly adopted development practices. It rationalizes and refines those practices, then publishes them as PDS packages for reference by PHP package authors.

PDS publications are derived from and supported by common practices existing in real packages, as adopted by existing authors who have a continuing interest in the quality and consistency of their own work.

Have a look at php-pds/skeleton GitHub repository.

Personally, I welcome this initiative.  PHP ecosystem exploded in the recent years with the help of composer and Packagist.org.  There are over 120,000 packages just on the Packagist.org.  I think, it’s good to have some standards and best practices.  The PHP Framework Interop Group (PHP-FIG) is doing its best with the PHP Standards Recommendations (PSRs).  But we could have some more guidelines in order to have some consistency.

PHP Package Development Standards takes, in my opinion, the right way of looking at what’s out there, what works and what doesn’t, and than setting the guidelines based on the real world practices.  They cover things like file and directory naming conventions, versioning, changelog and licensing – which are common issues for pretty much every package.

Looking at the packages that I am involved with, only a few minor changes are necessary to comply.  Mostly, the “config” folder instead of the Unix-style “etc“, CONTRIBUTING file, and a CHANGELOG file, which I’m still to find a good way to semi-automate.

Quick and easy introduction into PHP Mess Detector (PHPMD)

PHP Mess Detector is yet another one of those tools that help to keep the code base manageable and clean.  Here’s the description straight from the site:

What PHPMD does is: It takes a given PHP source code base and look for several potential problems within that source. These problems can be things like:

  • Possible bugs
  • Suboptimal code
  • Overcomplicated expressions
  • Unused parameters, methods, properties

Here is how you can jump right in.  It’s super easy.  It only takes 6 steps.

Step 1: Pick a project to try it on.

You can use any of your own PHP projects, or grab one from GitHub.  It doesn’t matter.  You’ll know better where to apply it once you get comfortable with the tool.  For sake of this quick guide, I’ll use one of our Open Source repositories – cakephp-groups plugin.

cd /tmp
git clone git@github.com:QoboLtd/cakephp-groups.git
cd cakephp-groups

Step 2: Install PHPMD with composer.

composer require phpmd/phpmd

Step 3: Run PHPMD.

If you run “./vendor/bin/phpmd“, you’ll see a help screen. But what’s the purpose of this blog post if you have to read the manual, right? So, let me simplify it for you. PHPMD needs three parameters:

  1. Path to the PHP source code that it will be examining.  We’ll use “src/“.
  2. Report format – one of: xml, text, or html.  We’ll use “html“.
  3. A choice of mess detection rules that you want it to apply.  You can create your own, or you can pick one from: cleancode, codesize, controversial, design, naming, unusedcode.  We’ll use “unusedcode“.

Also, we’ll give it an extra one: “–reportfile“, because by default PHPMD will spit everything to the standard output.  So, let’s put it together and see what we’ve got.

phpmd src/ html unusedcode --reportfile phpmd.html

Step 4: Examine the report.

After running PHPMD command above, you’ll find a phpmd.html file in the same folder. Here’s how it looked for me, when open in the browser.

PHP mess detector

So, PHPMD found one problem in the “src/Shell/Task/ImportTask.php” file on line 93.  Here’s the relevant piece of code:

    protected function _getImportErrors($entity)
    {
        $result = []; 
        if (!empty($entity->errors())) {
            foreach ($entity->errors() as $field => $error) {
                if (is_array($error)) {
                    $msg = implode(', ', $error);
                } else {
                    $msg = $errors;
                }
                $result[] = $msg . ' [' . $field . ']';
            }
        }

        return $result;
    }

As you can see (line 09 above is line 93 in the report), the issue reported by the PHPMD is a typo in the variable name. It should be $error, not $errors.

Step 5: Fix the problem.

  • Rename the $errors variable to $error.
  • Rerun the PHPMD report as per Step 3.
  • Examine report as per Step 4 to make sure that the problem is fixed and no new issues were introduced.
  • Create a new branch.
  • Commit the code.
  • Push the branch to GitHub.
  • Create the Pull Request.

All of the above mini steps took about 7 seconds.

Step 6: Pour yourself a drink.

You’ve just learned how to use a new tool, found a bug, and submitted a patch to the Open Source project.  At least I hope you did.

Not bad at all.

If you are wondering what to do next, here are a few suggestions:

  • Try running PHPMD for other types of issues.  As I said, it supports cleancode, codesize, controversial, design, naming, unusedcode, and we’ve only ran it for the “unusedcode”.  See what else is there.
  • Integrate PHPMD into your projects, to run automatically, together with your unit tests.  You do have automated unit tests, right?
  • Customize the ruleset that PHPMD is using to find more/less issues, which are maybe more specific to your project.
  • Use your newly acquired knowledge to fix issues with more Open Source projects.  You’ll make a name for yourself and you’ll make a world a better place.

Let me know how it goes.

PHP Static Analysis Tool – discover bugs in your code without running it!

Ondřej Mirtes shares the idea behind the creation of PHPStan – a static analysis tool for PHP:

Compiled languages need to know about the type of every variable, return type of every method etc. before the program runs. This is why the compiler needs to make sure that the program is “correct” and will happily point out to you these kinds of mistakes in the source code, like calling an undefined method or passing a wrong number of arguments to a function. The compiler acts as a first line of defense before you are able to deploy the application into production.

On the other hand, PHP is nothing like that. If you make a mistake, the program will crash when the line of code with the mistake is executed. When testing a PHP application, whether manually or automatically, developers spend a lot of their time discovering mistakes that wouldn’t even compile in other languages, leaving less time for testing actual business logic.

I’d like to change that.

This made sense to me, so I rushed to the repository.  I have quite a few projects to try this on.  I hurried so much that I didn’t pay attention to the important notes (aka prerequisities).  These are:

PHPStan requires PHP 7.0. You have to run it in environment with PHP 7 but the actual code does not have to use PHP 7 features. (Code written for PHP 5.6 and earlier can run on 7 mostly unmodified.)

PHPStan works best with modern object-oriented code. The more strongly-typed your code is, the more information you give PHPStan to work with.

Properly annotated and typehinted code (class properties, function and method arguments, return types) helps not only static analysis tools but also other people that work with the code to understand it.

Erm … if I had properly annotated and typehinted code, which is nicely organized into objects, I think, I wouldn’t need PHPStan as much as I need it now.  Anybody can analyze beautiful code.  Try figuring out what’s going on in a WordPress theme with 150 PHP files, split into classes, functions and chunks of unmaintainable code.  That’s where I wanted PHPStan to help me.

But OK.  Let’s see what it can do.  Gladly, my laptop already runs PHP 7 – here is a good first use for it.

Intstalling PHPStan with composer was easy.  All I had to do was resolve the nikic/php-parser dependency conflict between PHPStan and Sami, which is our source code documentation tool of choice (the newer version uses a much more recent version of the PHP Parser, so it wasn’t rocket science).

Once installed, a simple “vendor/bin/phpstan analyse ./src” command produced a report with a few issues.  Most of those were false positives, which can be fixed with a bit of PHPStan configuration.  But a few real problems that were found, were indeed bits that sneaked through our automated and manual testing.  For example:

------ ---------------------------------
 Line   src/Shell/EmailShell.php
------ ---------------------------------
 37      Return typehint of method App\Shell\EmailShell::getOptionParser() has invalid type App\Shell\ConsoleOptionParser.
------ ---------------------------------

I don’t think we’ll use PHPStan across all our code base just yet.  It’ll be too noisy for some projects.  And the PHP 7 requirement is not that easy to satisfy just yet.  But maybe sometime next year, once we finalize our move to PHP 7, I will integrate it into our automatic testing process.

All in all, it’s quite a useful tool and much needed for larger code bases.

Amazon RDS and Amazon Virtual Private Cloud (VPC)

Yesterday I helped a friend to figure out why he couldn’t connect to his Amazon RDS database inside the Amazon VPC (Virtual Private Cloud).  It was the second time someone asked me to help with the Amazon Web Services (AWS), and it was the first time I was actually helpful.  Yey!

While I do use quite a few of the Amazon Web Services, I don’t have any experience with the Amazon RDS yet, as I’m managing my own MySQL instances.  It was interesting to get my toes wet in the troubleshooting.

Here are a few things I’ve learned in the process.

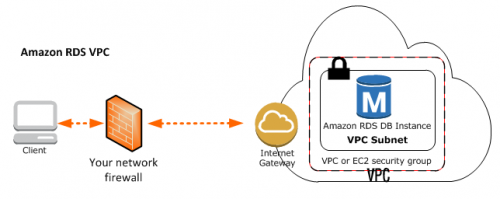
Lesson #1: Amazon supports two different ways of accessing the RDS service.  Make sure you know which one you are using and act accordingly.

gs-vpc-network

If you run an Amazon RDS instance in the VPC, you’ll have to setup your networking and security access properly.  This page – Connecting to a DB Instance Running the MySQL Database Engine – will only be useful once everything else is taken care of.  It’s not your first and only manual to visit.

Lesson #2 (sort of obvious): Make sure that both your Network ACL and Security Groups allow all the necessary traffic in and out.  Double-check the IP addresses in the rules.  Make sure you are not using a proxy server, when looking up your external IP address on WhatIsMyIP.com or similar.

Lesson #3: Do not use ICMP traffic (ping and such) as a troubleshooting tool.  It looks like Amazon RDS won’t be ping-able even if you allow it in your firewalls.  Try with “telnet your-rds-end-point-server your-rds-end-point-port” (example: “telnet 1.2.3.4 3306” or with a real database client, like the command-line MySQL one.

Lesson #4: Make sure your routing is setup properly.  Check that the subnet in which your RDS instance resides has the correct routing table attached to it, and that the routing table has the default gateway (0.0.0.0/0) route configured to either the Internet Gateway or to some sort of NAT.  Chances are your subnet is only dealing with private IP range and has no way of sending traffic outside.

Lesson #5: When confused, disoriented, and stuck, assume it’s not Amazon’s fault.  Keep calm and troubleshoot like any other remote connection issue.  Double-check your assumptions.

There’s probably lesson 6 somewhere there, about contacting support or something along those lines.  But in this particular case it didn’t get to that.  Amazon AWS support is excellent though.  I had to deal with those guys twice in the last two-something years, and they were awesome.