Amazon Elastic File System

Here are some great news from the Amazon AWS blog – the announcement of the Elastic File System (EFS):

EFS lets you create POSIX-compliant file systems and attach them to one or more of your EC2 instances via NFS. The file system grows and shrinks as necessary (there’s no fixed upper limit and you can grow to petabyte scale) and you don’t pre-provision storage space or bandwidth. You pay only for the storage that you use.

EFS protects your data by storing copies of your files, directories, links, and metadata in multiple Availability Zones.

In order to provide the performance needed to support large file systems accessed by multiple clients simultaneously,Elastic File System performance scales with storage (I’ll say more about this later).

I think this might have been the most requested feature/service from Amazon AWS since EC2 launch.  Sure, one could have built an NFS file server before, but with the variety of storage options, availability zones, and the dynamic nature of the cloud setup itself, that was quite a challenge.  Now – all that and more in just a few clicks.

Thank you Amazon!


Let’s Encrypt on CentOS 7 and Amazon AMI

The last few weeks were super busy at work, so I accidentally let a few SSL certificates expire.  Renewing them is always annoying and time consuming, so I was pushing it until the last minute, and then some.

Instead of going the usual way for the renewal, I decided to try to the Let’s Encrypt deal.  (I’ve covered Let’s Encrypt before here and here.)  Basically, Let’s Encrypt is a new Certification Authority, created by Electronic Frontier Foundation (EFF), with the backing of Google, Cisco, Mozilla Foundation, and the like.  This new CA is issuing well recognized SSL certificates, for free.  Which is good.  But the best part is that they’ve setup the process to be as automated as possible.  All you need is to run a shell command to get the certificate and then another shell command in the crontab to renew the certificate automatically.  Certificates are only issued for 3 months, so you’d really want to have them automatically updated.

It took me longer than I expected to figure out how this whole thing works, but that’s because I’m not well versed in SSL, and because they have so many different options, suited for different web servers, and different sysadmin experience levels.

Eventually I made it work, and here is the complete process, so that I don’t have to figure it out again later.

We are running a mix of CentOS 7 and Amazon AMI servers, using both Nginx and Apache.   Here’s what I had to do.

First things first.  Install the Let’s Encrypt client software.  Supposedly there are several options, but I went for the official one.  Manual way:

# Install requirements
yum install git bc
cd /opt
git clone https://github.com/certbot/certbot letsencrypt

Alternatively, you can use geerlingguy’s lets-encrypt-role for Ansible.

Secondly, we need to get a new certificate.  As I said before, there are multiple options here.  I decided to use the certonly way, so that I have better control over where things go, and so that I would minimize the web server downtime.

There are a few things that you need to specify for the new SSL certificate.  These are:

  • The list of domains, which the certificate should cover.  I’ll use example.com and www.example.com here.
  • The path to the web folder of the site.  I’ll use /var/www/vhosts/example.com/
  • The email address, which Let’s Encrypt will use to contact you in case there is something urgent.  I’ll use ssl@example.com here.

Now, the command to get the SSL certificate is:

/opt/letsencrypt/certbot-auto certonly --webroot --email ssl@example.com --agree-tos -w /var/www/vhosts/example.com/ -d example.com -d www.example.com

When you run this for the first time, you’ll see that a bunch of additional RPM packages will be installed, for the virtual environment to be created and used.  On CentOS 7 this is sufficient.  On Amazon AMI, the command will run, install things, and will fail with something like this:

WARNING: Amazon Linux support is very experimental at present...
if you would like to work on improving it, please ensure you have backups
and then run this script again with the --debug flag!

This is useful, but insufficient.  Before you can run successfully, you’ll also need to do the following:

yum install python26-virtualenv

Once that is done, run the certbot command with the –debug parameter, like so:

/opt/letsencrypt/certbot-auto certonly --webroot --email ssl@example.com --agree-tos -w /var/www/vhosts/example.com/ -d example.com -d www.example.com --debug

This should produce a success message, with “Congratulations!” and all that.  The path to your certificate (somewhere in /etc/letsencrypt/live/example.com/) and its expiration date will be mentioned too.

If you didn’t get the success message, make sure that:

  • the domain, for which you are requesting a certificate, resolves back to the server, where you are running the certbot command.  Let’s Encrypt will try to access the site for verification purposes.
  • that public access is allowed to the /.well-known/ folder.  This is where Let’s Encrypt will store temporary verification files.  Note that the folder starts with dot, which in UNIX means hidden folder, which are often denied access to by many web server configurations.

Just drop a simple hello.txt to the /.well-known/ folder and see if you can access it with the browser.  If you can, then Let’s Encrypt shouldn’t have any issues getting you a certification.  If all else fails, RTFM.

Now that you have the certificate generated, you’ll need to add it to the web server’s virtual host configuration.  How exactly to do this varies from web server to web server, and even between the different versions of the same web server.

For Apache version >= 2.4.8 you’ll need to do the following:

SSLEngine on
SSLCertificateKeyFile /etc/letsencrypt/live/example.com/privkey.pem
SSLCertificateFile /etc/letsencrypt/live/example.com/fullchain.pem

For Apache version < 2.4.8 you’ll need to do the following:

SSLEngine on
SSLCertificateKeyFile /etc/letsencrypt/live/example.com/privkey.pem
SSLCertificateFile /etc/letsencrypt/live/example.com/cert.pem
SSLCertificateChainFile /etc/letsencrypt/live/example.com/chain.pem

For Nginx >= 1.3.7 you’ll need to do the following:

ssl_certificate /etc/letsencrypt/live/example.com/fullchain.pem;
ssl_certificate_key /etc/letsencrypt/live/example.com/privkey.pem;

You’ll obviously need the additional SSL configuration options for protocols, ciphers and the like, which I won’t go into here, but here are a few useful links:

Once your SSL certificate is issued and web server is configured to use it, all you need is to add an entry to the crontab to renew the certificates which are expiring in 30 days or less.  You’ll only need a single entry for all your certificates on this machine.  Edit your /etc/crontab file and add the following (adjust for your web server software, obviously):

# Renew Let's Encrypt certificates at 6pm every Sunday
0 18 * * 0 root (/opt/letsencrypt/certbot-auto renew &amp;&amp; service httpd restart)

That’s about it.  Once all is up and running, verify and adjust your SSL configuration, using Qualys SSL Labs excellent tool.
Support lesson to learn from Amazon AWS

I’ve said a million times how happy I am with Amazon AWS.  Today I also want to share a positive lesson to learn from their technical support.  It’s the second time I’ve contacted them over the last year and a half, and it’s the second time I am amazed at how good well it works.

In my experience, technical support departments usually rely on one primary communication channel – be that a telephone, an email, a ticketing system, or a live chat.  The other channels are often just routed or converted into the main one, or, even, completely ignored.  But each one of those has it’s benefits and side effects.

Telephone provides the most immediate connectivity, and a much valued option of the human interaction.  But the communication is verbal, often without the paper trail.  It makes it difficult to carbon copy (CC) people on the conversation or review exactly what has been said.  It is also very free form, unstructured.

Live chat is also free form and unstructured, but it’s written, so transcripts are easily available.  It also helps with the carbon copy, but only on the receiving end – supervisors or field experts can often be included in the conversation, but adding somebody from the requesting side is rarely supported.

Email makes it easy to carbon copy people on both ends.  It provides the paper trail, but often lacks the immediate response factor.  And it’s still unstructured, making it difficult to figure out what was requested, what has been discussed and whether or not there was any resolution.  (Have you ever been a part of a lengthy multi-lingual conversation about, what turned out to be, multiple issues in the same thread?)

Ticketing/support systems help to structure the conversation and make it follow a certain workflow.  But they often lack humanity and, much like emails, the immediate response.

Now, what Amazon AWS support has done is a beautiful combination of a ticketing system and a phone.  You start off with the ticketing system – login, create a new support case, providing all the necessary information, and optionally CC other people from a single short form.  The moment you submit it, the web page asks for your phone number.  Once entered, a phone call is placed immediately by the system, connecting you to the support engineer.  The engineer confirms a few case details and lets you know that the case is in progress and expected resolution time (I was asking to raise the limit of the Elastic IP addresses on the Virtual Private Cloud, and I was told it will be done in the next 15 to 30 minute.  And it was done in 10!).  I have also received two emails – one confirming the opening of the case, with all the requested details, and another one notifying me that the work has been done, providing quick information on how to follow up, in case I needed to.

Overall experience was very smooth, fast, to the point, and very effective.  I never got lost.  I never had to figure anything out.  And my problem was attended to and resolved immediately.

I only wish more companies provided this level of support.  I’ll sure try too – but it’s a bar set high.


Top level domain nonsense and how it can break your stuff

Call me old school, but I really (I mean REALLY) don’t like the recent explosion of the top level domains.  I understand that most good names are taken in .com, .org, and .net zones, but do we really need all those .blue, .parts, and .yoga TLDs?

Why am I whining about all this all of a sudden?  I’ll tell you why.  Because a new top level domain – .aws – is about to be introduced, and it already broke something for me in a non-obvious manner.

aws

I manage a few Virtual Private Clouds on the Amazon AWS.  Many of these use and rely on some hostname naming convention (yeah, I’m familiar with the pets vs. cattle idea).  Imagine you have a few servers, which are separated into generic infrastructure and client segments, like so:

  • bastion.aws.example.com
  • firewall.aws.example.com
  • lb.aws.example.com
  • web.client1.example.com
  • db.client1.example.com
  • web.client2.example.com
  • db.client2.example.com
  • … and so on.

Working with such long FQDNs (fully qualified domain names) isn’t very convenient.  So add “search example.com” to your /etc/resolve.conf file and now you can use short hostnames like firewall.aws and web.client1.  And life is beautiful …

… until one day, when you see the following:

user@bastion.aws$> ssh firewall.aws
Permission denied (publickey).

And that’s when your heart misses a beat, the world freezes, and you go: “WTF?”.  All kinds of thoughts are rushing through your head.  Is it a typo?  Am I in the right place? Did the server get compromised?  How’s that for a little panic …

Trying a few things here and there, you manage to get into the server from somewhere else.  You are very careful.  You are looking around for any traces of the break-in, but you see nothing.  You dig through the logs both on the server and off it.  Still nothing.  You can dive into all those logwatch and cron messages in your Trash, that you were automatically deleting, cause things were working fine for so long.  There!  You find that cron was complaining that backup script couldn’t get into this machine.  Uh-oh.  This was happening for a few days now.  A black cloud of combined worry for the compromised machine and outdated backup kills the sunlight in your life.  Dammit!

Take a break to calm down.  Try to think clearly.  Don’t panic.  Stop assuming things, and start troubleshooting.

A few minutes later, you establish that the problem is not limited to that particular machine.  All your .aws hosts share this headache.  A few more minutes later, you learn that ‘ssh firewall.aws.example.com’ works fine, while ‘ssh firewall.aws’ still doesn’t.

That points toward the hostname resolution issue.   With that, it takes only a few more moments to see the following:

user@bastion.aws$> host firewall.aws
firewall.aws has address 127.0.53.53
firewall.aws mail is handled by 10 your-dns-needs-immediate-attention.aws.

Say what?  That’s not at all what I expected.  And what is that that I need to fix with my DNS?  Google search brings this beauty:

This is problably because the .dev and .local are now valid top level extensions.

Really? Who’s the genius behind that?  I thought people chose those specifically to make them internal.  So is there an .aws top level extension now too?  You bet there is!

Solution?  Well, as far as I am concerned, from this day onward, I don’t trust the brief hostnames anymore.  It’s FQDN or nothing.

AWS Database Migration Service

AWS Database Migration Service

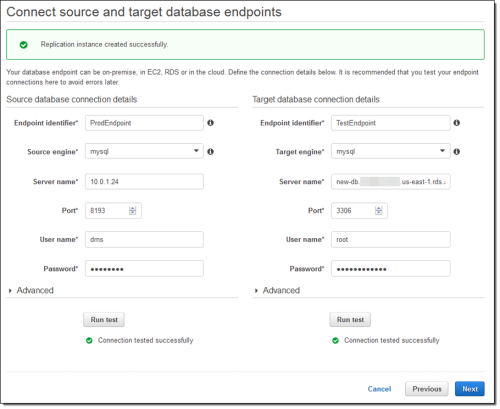
AWS Database Migration Service is yet another one of those tools that you always wished that somebody created, but never actually got to checking if it exists.  Here is a recent blog post showcasing the functionality.

Do you currently store relational data in an on-premises Oracle, SQL Server, MySQL, MariaDB, or PostgreSQL database? Would you like to move it to the AWS cloud with virtually no downtime so that you can take advantage of the scale, operational efficiency, and the multitude of data storage options that are available to you?

If so, the new AWS Database Migration Service (DMS) is for you! First announced last fall at AWS re:Invent, our customers have already used it to migrate over 1,000 on-premises databases to AWS. You can move live, terabyte-scale databases to the cloud, with options to stick with your existing database platform or to upgrade to a new one that better matches your requirements.  If you are migrating to a new database platform as part of your move to the cloud, the AWS Schema Conversion Tool will convert your schemas and stored procedures for use on the new platform.