 This is my attempt to provide a clear and simple instructions on adopting Vim text editor for programming needs. I am using Perl as the programming language in the examples, but most of this document will apply equally for any other programming language.
Update: This post was translated into Portuguese by Alceu Rodrigues de Freitas Junior.
Introduction
What is this document?
This document is my attempt to provide a clear and simple instructions on adopting Vim text editor for programming needs. I am using Perl programming language as specific example, although most of this document will apply equally for any other programming language.
Some people may argue that Vim does not need any additional configuration to cover programming needs, while others will say it will never be as good as some Integrated Development Environments (IDEs). I am not going to argue about these two points of view, but rather provide several tips on how to bring a simple text editor, as seen by some, closer to look and feel of an IDE, as needed by others.
Who should read this document?
First of all, this document is for people who are already using Vim for their programming tasks. Those people who feel that there is something missing in Vim should definitely read this document. People who recently stopped using Vim due to the reason that something was not there should also read this document.
Prerequisites
I assume that the reader has Vim installed on the system and is comfortable with simple text editing in Vim.
Another assumption is that the reader has at least basic experience in configuring Vim by means of the .vimrc configuration file.
I assume that the reader is using a UNIX/Linux machine for Vim editing sessions. Otherwise, shell command line examples should be taken as a pseudo code for algorithm. :)
The last but the least assumption is that the reader has access to the Internet and knows how to browse web sites and download files.
Structure of the document
Document is separated into two parts: “Basic Configuration” and “Advanced Configuration“. “Advanced Configuration” is further split into “Common Configuration” and “Perl-Specific Configuration“.
“Basic Configuration” contains examples of simplest Vim configuration that does not even require Internet connectivity. These are usually plain Vim configuration options which are built-in.
“Advanced Configuration” contains examples Vim plug-in installation and configuration. You will need Internet connectivity to follow this section.
If you use Vim for your programming tasks, but do not use Perl programming language, then “Common Configuration” section is for you. Examples in “Perl-Specific Configuration” section can be used for extending Vim support for other programming languages.
Methodology
In order to provide a guaranteed working examples, I have created a new user “codemonkey” on my fully updated RedHat Linux 7.3 home server. This user has no prior .vimrc configuration file and uses only the system-wide default file, which was not modified by me in any way. RedHat’s vim-6.1 version is installed on the server with no changes what-so-ever.
I have created an empty .vimrc in /home/codemonkey/ directory, which is a home directory for the “codemonkey” user. I have also created user specific Vim directory structure as follows:
[codemonkey@gucho codemonkey]$ # Which version of Vim is installed?
[codemonkey@gucho codemonkey]$ rpm -qa | grep -i vim
vim-minimal-6.1-18.7x.2
vim-common-6.1-18.7x.2
vim-enhanced-6.1-18.7x.2
[codemonkey@gucho codemonkey]$ # In which directory am I now?
[codemonkey@gucho codemonkey]$ pwd
/home/codemonkey
[codemonkey@gucho codemonkey]$ # User-specific Vim configuration
[codemonkey@gucho codemonkey]$ touch .vimrc
[codemonkey@gucho codemonkey]$ mkdir .vim
[codemonkey@gucho codemonkey]$ mkdir .vim/colors
[codemonkey@gucho codemonkey]$ mkdir .vim/compiler
[codemonkey@gucho codemonkey]$ mkdir .vim/doc
[codemonkey@gucho codemonkey]$ mkdir .vim/ftplugin
[codemonkey@gucho codemonkey]$ mkdir .vim/plugin
[codemonkey@gucho codemonkey]$ mkdir .vim/syntax
Each feature installation and/or configuration is explained separately and can be done independently of the others. Screenshots are provided, where appropriate.
Additional help resources
Vim has a large community with a lot of friendly and supportive members. If you are using Vim or just planning to do so, I suggest that you subscribe to Vim mailing list at http://www.vim.org/community.php.
Visit the Vim website for a collection of Tips and Plug-ins at http://www.vim.org/.
Vim is shipped with an extensive documentation which you can find in /usr/share/doc/vim-common-6.1/docs/directory (you path may vary slightly). I have put mentioned documentation files from this directory where appropriate.
Basic Configuration
Text wrapping
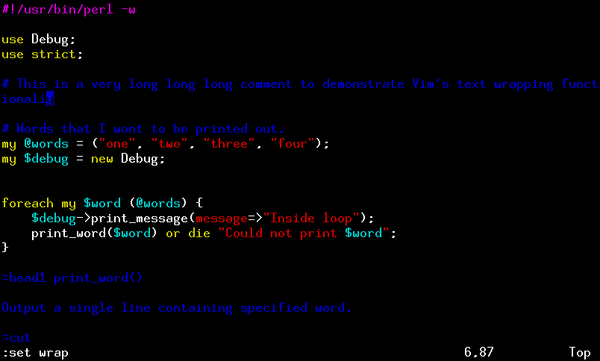 As you code, sometimes text flows further than the width of the editor window. Some people like long lines to be wrapped (in other words, continued on the other line), while others prefer them unwrapped. You can configure Vim to behave according to your liking by adding “
set wrap” or “set nowrap” to your .vimrc configuration file.
Flexible tabs
Tabulation is one of the hottest topics in programmers discussions when it comes to style. A very nice explanation of what is the problem with tabulations and spaces can be read at http://www.jwz.org/doc/tabs-vs-spaces.html. I must say though, that I don’t agree with author’s position on the subject.
The article does provide you with several options for vi/Vim configuration to control the behavior of the tabs. I will just add/repeat the ones I consider important.
Add “set tabstop=4” to your .vimrc to display all occurrences of Tab character (ASCII #9) as 4 spaces. This option will not change the text, it will only change the displaying of the text.
Add “set autoindent” to your .vimrc for Vim to automatically position the cursor with appropriate indentation level when you press Enter and want to write the next line of code. This is very useful when you are indenting your code in structures like loops and procedures.
Vim allows you to select a block of code and change it’s indentation level (either increase or decrease the level). Control the width of the indentation level with “set shiftwidth=4” in your .vimrc configuration file.
While you are in the command mode, Vim can complete the names of files and directories in case you want to open or save a file. In order to complete a file or a directory name you should start typing it’s name on the command prompt and then press the completion key. You can change the completion key to be almost anything you want with “set wildchar=” line in your .vimrc file.
If you need more information on this topic, read file /usr/share/doc/vim-common-6.1/docs/indent.txt.
Line numbering
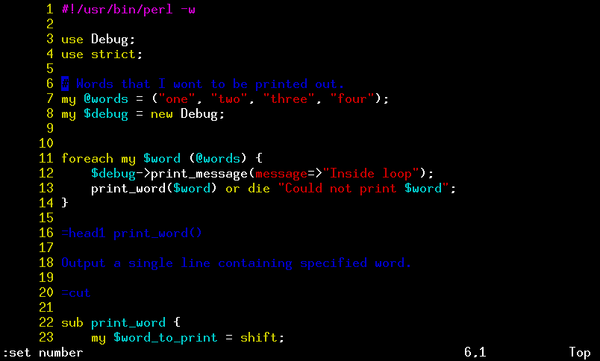 While Vim always displays your current position in the status line, you might also want to see all lines numbered. To do that, you will need to add “
set number” to your .vimrc.
If you need more information on this topic, read file /usr/share/doc/vim-common-6.1/docs/usr_03.txt.
Syntax highlighting
 The first thing any developer will notice in Vim is excellent syntax highlighting. All popular languages are supported. Syntax files for less popular are available from Vim web site. Perl is supported out of the box.
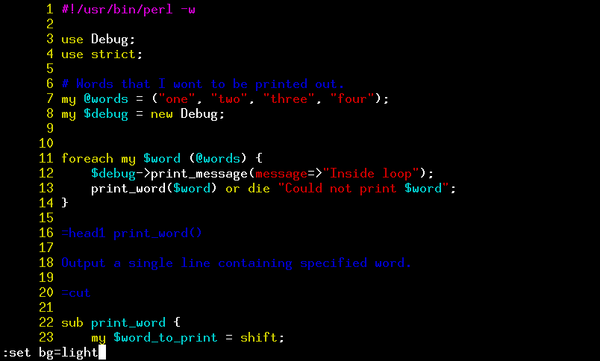
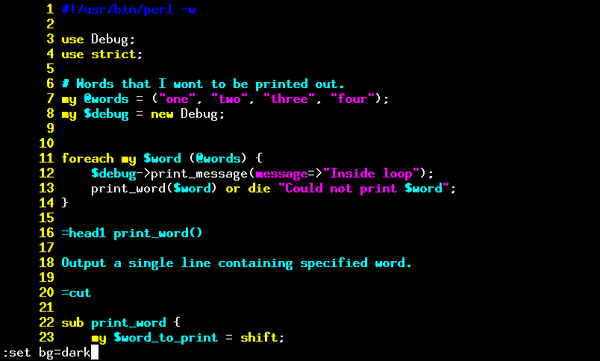 Vim identifies keywords, comments, variables, strings, in-line POD and other standard parts of the program and highlights them. Vim supports two color modes: one for terminals with dark background color and another one for terminals with light background color. You can control these modes by specifying command “
set bg=dark” and “set bg=light” in your .vimrc.
If you still don’t like the appearance of the code, stay tuned until “Color schemes” discussion.
If you need more information on this topic, read file /usr/share/doc/vim-common-6.1/docs/syntax.txt.
Text completion
One of Vim’s features I cannot live without is text completion. When editing, press Ctrl-n / Ctrl-p to cycle through the current word completion suggestions. Vim generates suggest list based on the words in the current file. If you need key completion to make suggestions from other files, then Vim by default understand the ctags file. Simply run “ctags *.p?” to generate ctags for all Perl files and modules in the current directory (assuming you are using “.pl” extension for Perl scripts and “.pm” extension for Perl modules). This Vim’s feature not only saves a tonne of time on typing, but greatly decreases the error rate, especially with long variable and procedure names in the code.
If you need more information on this topic, read file /usr/share/doc/vim-common-6.1/docs/usr_24.txt.
Window splitting
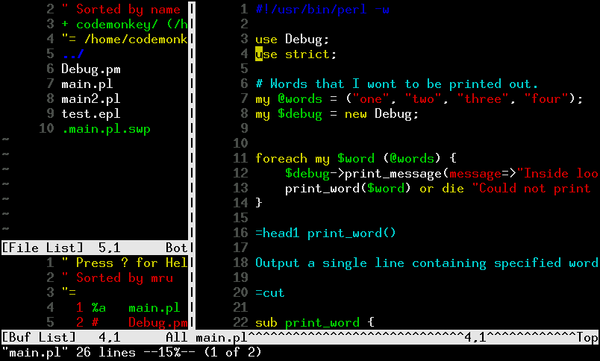
 Sometimes I need to see two or more files simultaneously. While I can always start another Vim session in a separate terminal, it is not as comfortable at times as Vim’s window splitting feature.
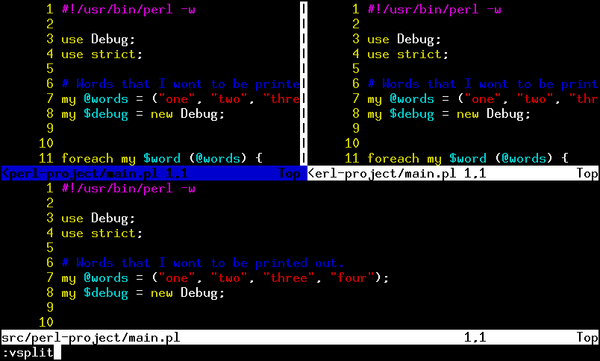
Vim supports both vertical and horizontal window splitting. To split current window horizontally execute “:split” while in the normal mode. To split current window vertically, use “:vsplit” instead. If you don’t provide any filename as argument to split/vsplit then current filename is used. You further split resulting windows as much as you like. Use Ctrl-w w to cycle through the windows. “:close” will close the current windows. “:only” will close all windows except the current one.
If you need more information on this topic, read file /usr/share/doc/vim-common-6.1/docs/usr_08.txt.
Diff mode
 Vim provides excellent facilities for checking and editing differences between two or more files. Execute “
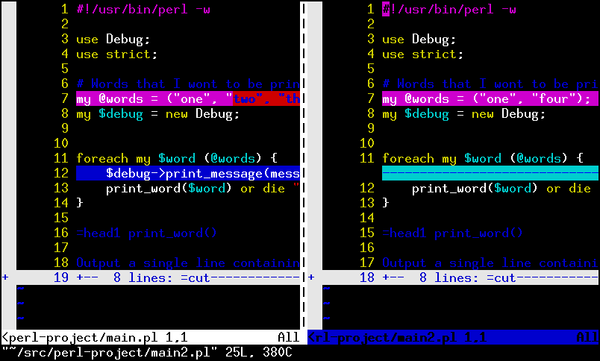
vimdiff main.pl main2.pl” (or “vim -d main.pl main2.pl“) from the command line to see difference made to file main.pl in file main2.pl.
Vim will show both files in vertical split window mode. When you will scroll in one window, Vim will automatically scroll another window for you. You can patch the individual differences using do and dp commands. do will get the patch from the neighbor window and apply it to the current buffer, while dp will apply the difference from the current buffer to the neighbor window.
If you need more information on this topic, read file /usr/share/doc/vim-common-6.1/docs/diff.txt.
Text folding
 Yet another popular feature found in popular editors and IDEs is text folding. I think that folding is easier shown then explained.
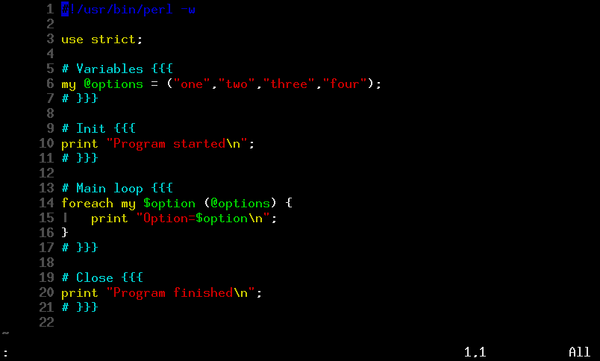
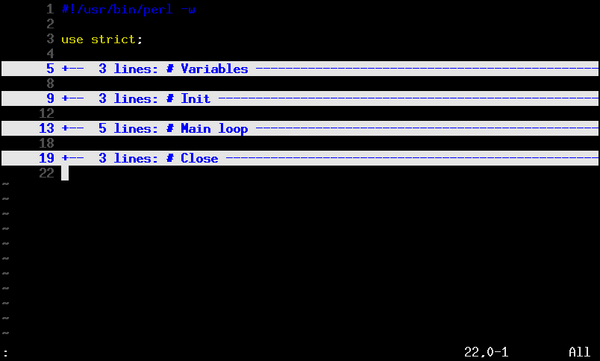
Vim supports six folding methods: by indent, by expression, by syntax, by changes in the text, by marker, and manual folding. It is up to you which method to use. For the sake of the example, I will show how to configure folding by marker.
In order to tell Vim to use folding by marker add the following lines to your .vimrc:
" Folding configuration
set foldmethod=marker
" Edit and uncomment next line if you want non-default marker
"set foldmarker="{{{,}}}"
If you need more information on this topic, read files /usr/share/doc/vim-common-6.1/docs/usr_28.txt and /usr/share/doc/vim-common-6.1/docs/fold.txt.
Marks
One of Vim’s features that speeds up navigation is – marks. You can set a mark anywhere in the text and then quickly jump back to it. You can set several marks. You can set marks in several files and then quickly switch between them. I find myself set mark on the place I am currently working at with mc (m is for “mark”, c I use for “current”) and then quickly returning to the same place with 'c.
If you need more information on this topic, read file /usr/share/doc/vim-common-6.1/docs/motion.txt.
Vertical Indent Display
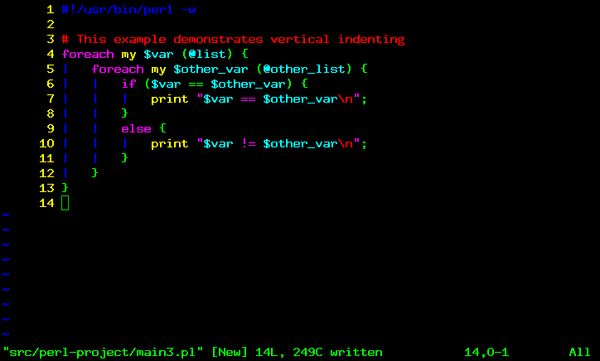 For some people indenting text horizontally is not enough. They need some kind of vertical indentation to help them see corresponding parts of the code. While I am not one of those people, I’ve seen this feature around so often that I decided to add it codemonkey’s
 .vimrc.
All you need to do to have vertical indent display with pipe (“|”) character is to add the following two lines to your .vimrc.
" This is for vertical indenting
set list
set listchars=tab:|
" NOTE the space char after last backslash.
“:set list” forces Vim to show hidden characters like tabulations, ends of lines, and ends of files. “:set listchars=tab:| ” asks Vim to show only tab characters and use a pipe (“|”) with a space (” “) to do so, instead of usual “^I” thing that Vim likes to show.
Advanced Configuration
Common Configuration
Color schemes
 Let’s start simple. Vim website offers a handful of color schemes for all tastes and preferences. Finding and downloading these color schemes one by one can be a pain though. Luckily, world is not without kind people. Someone named Robert (MetaCosm) downloaded all color schemes and put them into a single archive file which he uploaded back to Vim’s web site. Let’s download it from http://www.vim.org/scripts/script.php?script_id=625.
Save colors.zip in your .vim/ directory and unzip it. Making sure that all the files in UNIX format is also a good idea.
[codemonkey@gucho .vim]$ ls
colors.zip
[codemonkey@gucho .vim]$ unzip colors.zip
Archive:  colors.zip
   creating: colors/
  inflating: colors/adaryn.vim
  inflating: colors/adrian.vim
  inflating: colors/aqua.vim
  inflating: colors/astronaut.vim
  inflating: colors/asu1dark.vim
  inflating: colors/autumn.vim
  inflating: colors/biogoo.vim
  inflating: colors/blackdust.vim
  inflating: colors/BlackSea.vim
  inflating: colors/blue.vim
  inflating: colors/bluegreen.vim
  inflating: colors/bog.vim
  inflating: colors/borland.vim
  inflating: colors/breeze.vim
  inflating: colors/brookstream.vim
  inflating: colors/brown.vim
  inflating: colors/bw.vim
  inflating: colors/c.vim
  inflating: colors/camo.vim
  inflating: colors/candy.vim
  inflating: colors/caramel.vim
  inflating: colors/ChocolateLiquor.vim
  inflating: colors/coffee.vim
  inflating: colors/colorer.vim
  inflating: colors/colorscheme_template.vim
  inflating: colors/cool.vim
  inflating: colors/dante.vim
  inflating: colors/darkblue.vim
  inflating: colors/darkdot.vim
  inflating: colors/darkocean.vim
  inflating: colors/darkslategray.vim
  inflating: colors/dawn.vim
  inflating: colors/default.vim
  inflating: colors/denim.vim
  inflating: colors/desert.vim
  inflating: colors/elflord.vim
  inflating: colors/emacs.vim
  inflating: colors/evening.vim
  inflating: colors/fine_blue.vim
  inflating: colors/fnaqevan.vim
  inflating: colors/fog.vim
  inflating: colors/golden.vim
  inflating: colors/ibmedit.vim
  inflating: colors/ironman.vim
  inflating: colors/koehler.vim
  inflating: colors/lanzarotta.vim
  inflating: colors/lilac.vim
  inflating: colors/manxome.vim
  inflating: colors/midnight.vim
  inflating: colors/midnight2.vim
  inflating: colors/morning.vim
  inflating: colors/murphy.vim
  inflating: colors/navajo-night.vim
  inflating: colors/navajo.vim
  inflating: colors/night.vim
  inflating: colors/nightshimmer-theme.vim
  inflating: colors/nightwish.vim
  inflating: colors/northsky.vim
  inflating: colors/oceanblack.vim
  inflating: colors/oceandeep.vim
  inflating: colors/pablo.vim
  inflating: colors/PapayaWhip.vim
  inflating: colors/peachpuff.vim
  inflating: colors/potts.vim
  inflating: colors/print_bw.vim
  inflating: colors/rainbow_autumn.vim
  inflating: colors/rainbow_breeze.vim
  inflating: colors/rainbow_fine_blue.vim
  inflating: colors/rainbow_fruit.vim
  inflating: colors/rainbow_neon.vim
  inflating: colors/rainbow_night.vim
  inflating: colors/rainbow_sea.vim
  inflating: colors/redblack.vim
  inflating: colors/ron.vim
  inflating: colors/sand.vim
  inflating: colors/scite.vim
  inflating: colors/sean.vim
  inflating: colors/seashell.vim
  inflating: colors/shine.vim
  inflating: colors/taqua.vim
  inflating: colors/tomatosoup.vim
  inflating: colors/toothpik.vim
  inflating: colors/torte.vim
  inflating: colors/transparent.vim
  inflating: colors/whitedust.vim
  inflating: colors/wintersday.vim
  inflating: colors/xemacs.vim
  inflating: colors/xian.vim
  inflating: colors/zellner.vim
  inflating: colors/zenburn.vim
[codemonkey@gucho .vim]$ dos2unix colors/*
dos2unix: converting file colors/BlackSea.vim to UNIX format ...
dos2unix: converting file colors/ChocolateLiquor.vim to UNIX format ...
dos2unix: converting file colors/PapayaWhip.vim to UNIX format ...
dos2unix: converting file colors/adaryn.vim to UNIX format ...
dos2unix: converting file colors/adrian.vim to UNIX format ...
dos2unix: converting file colors/aqua.vim to UNIX format ...
dos2unix: converting file colors/astronaut.vim to UNIX format ...
dos2unix: converting file colors/asu1dark.vim to UNIX format ...
dos2unix: converting file colors/autumn.vim to UNIX format ...
dos2unix: converting file colors/biogoo.vim to UNIX format ...
dos2unix: converting file colors/blackdust.vim to UNIX format ...
dos2unix: converting file colors/blue.vim to UNIX format ...
dos2unix: converting file colors/bluegreen.vim to UNIX format ...
dos2unix: converting file colors/bog.vim to UNIX format ...
dos2unix: converting file colors/borland.vim to UNIX format ...
dos2unix: converting file colors/breeze.vim to UNIX format ...
dos2unix: converting file colors/brookstream.vim to UNIX format ...
dos2unix: converting file colors/brown.vim to UNIX format ...
dos2unix: converting file colors/bw.vim to UNIX format ...
dos2unix: converting file colors/c.vim to UNIX format ...
dos2unix: converting file colors/camo.vim to UNIX format ...
dos2unix: converting file colors/candy.vim to UNIX format ...
dos2unix: converting file colors/caramel.vim to UNIX format ...
dos2unix: converting file colors/coffee.vim to UNIX format ...
dos2unix: converting file colors/colorer.vim to UNIX format ...
dos2unix: converting file colors/colorscheme_template.vim to UNIX format ...
dos2unix: converting file colors/cool.vim to UNIX format ...
dos2unix: converting file colors/dante.vim to UNIX format ...
dos2unix: converting file colors/darkblue.vim to UNIX format ...
dos2unix: converting file colors/darkdot.vim to UNIX format ...
dos2unix: converting file colors/darkocean.vim to UNIX format ...
dos2unix: converting file colors/darkslategray.vim to UNIX format ...
dos2unix: converting file colors/dawn.vim to UNIX format ...
dos2unix: converting file colors/default.vim to UNIX format ...
dos2unix: converting file colors/denim.vim to UNIX format ...
dos2unix: converting file colors/desert.vim to UNIX format ...
dos2unix: converting file colors/elflord.vim to UNIX format ...
dos2unix: converting file colors/emacs.vim to UNIX format ...
dos2unix: converting file colors/evening.vim to UNIX format ...
dos2unix: converting file colors/fine_blue.vim to UNIX format ...
dos2unix: converting file colors/fnaqevan.vim to UNIX format ...
dos2unix: converting file colors/fog.vim to UNIX format ...
dos2unix: converting file colors/golden.vim to UNIX format ...
dos2unix: converting file colors/ibmedit.vim to UNIX format ...
dos2unix: converting file colors/ironman.vim to UNIX format ...
dos2unix: converting file colors/koehler.vim to UNIX format ...
dos2unix: converting file colors/lanzarotta.vim to UNIX format ...
dos2unix: converting file colors/lilac.vim to UNIX format ...
dos2unix: converting file colors/manxome.vim to UNIX format ...
dos2unix: converting file colors/midnight.vim to UNIX format ...
dos2unix: converting file colors/midnight2.vim to UNIX format ...
dos2unix: converting file colors/morning.vim to UNIX format ...
dos2unix: converting file colors/murphy.vim to UNIX format ...
dos2unix: converting file colors/navajo-night.vim to UNIX format ...
dos2unix: converting file colors/navajo.vim to UNIX format ...
dos2unix: converting file colors/night.vim to UNIX format ...
dos2unix: converting file colors/nightshimmer-theme.vim to UNIX format ...
dos2unix: converting file colors/nightwish.vim to UNIX format ...
dos2unix: converting file colors/northsky.vim to UNIX format ...
dos2unix: converting file colors/oceanblack.vim to UNIX format ...
dos2unix: converting file colors/oceandeep.vim to UNIX format ...
dos2unix: converting file colors/pablo.vim to UNIX format ...
dos2unix: converting file colors/peachpuff.vim to UNIX format ...
dos2unix: converting file colors/potts.vim to UNIX format ...
dos2unix: converting file colors/print_bw.vim to UNIX format ...
dos2unix: converting file colors/rainbow_autumn.vim to UNIX format ...
dos2unix: converting file colors/rainbow_breeze.vim to UNIX format ...
dos2unix: converting file colors/rainbow_fine_blue.vim to UNIX format ...
dos2unix: converting file colors/rainbow_fruit.vim to UNIX format ...
dos2unix: converting file colors/rainbow_neon.vim to UNIX format ...
dos2unix: converting file colors/rainbow_night.vim to UNIX format ...
dos2unix: converting file colors/rainbow_sea.vim to UNIX format ...
dos2unix: converting file colors/redblack.vim to UNIX format ...
dos2unix: converting file colors/ron.vim to UNIX format ...
dos2unix: converting file colors/sand.vim to UNIX format ...
dos2unix: converting file colors/scite.vim to UNIX format ...
dos2unix: converting file colors/sean.vim to UNIX format ...
dos2unix: converting file colors/seashell.vim to UNIX format ...
dos2unix: converting file colors/shine.vim to UNIX format ...
dos2unix: converting file colors/taqua.vim to UNIX format ...
dos2unix: converting file colors/tomatosoup.vim to UNIX format ...
dos2unix: converting file colors/toothpik.vim to UNIX format ...
dos2unix: converting file colors/torte.vim to UNIX format ...
dos2unix: converting file colors/transparent.vim to UNIX format ...
dos2unix: converting file colors/whitedust.vim to UNIX format ...
dos2unix: converting file colors/wintersday.vim to UNIX format ...
dos2unix: converting file colors/xemacs.vim to UNIX format ...
dos2unix: converting file colors/xian.vim to UNIX format ...
dos2unix: converting file colors/zellner.vim to UNIX format ...
dos2unix: converting file colors/zenburn.vim to UNIX format ...
[codemonkey@gucho .vim]$
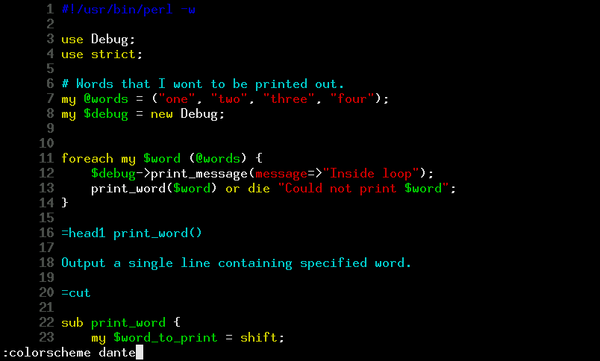
vim and gvim color schemes
You will most likely notice that some color schemes do not change much colors in your console
vim. That is because they are most probably designed for GUI version of Vim, calledgvim.Try executing “
gvim +'colorscheme peachpuff' main.pl” to see how gvim looks with selected color scheme.
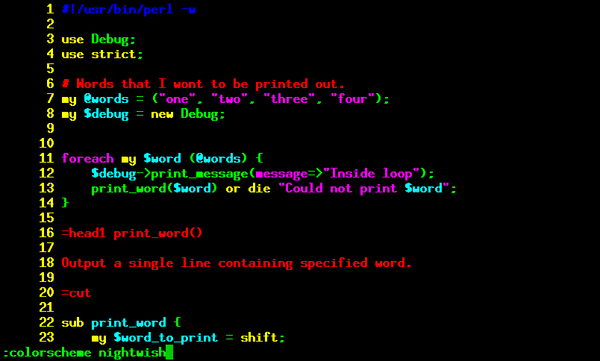 Now you can try all those color schemes one by one with “
:colorscheme something” and choose the one you like best. When you are done choosing, add line “colorscheme something” to your .vimrc.
If you need more information on this topic, read file /usr/share/doc/vim-common-6.1/docs/usr_06.txt.
Block commenting
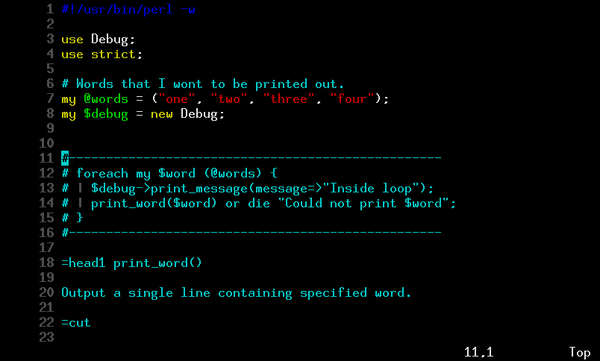 It is an often need to comment or uncomment blocks of code during the development cycle. While there is a way to do it in Vim without any additional configuration, I try to make life as easy as possible and install the BlockComment plug-in by Chris Russell.
Let’s download BlockComment.vim from http://www.vim.org/scripts/script.php?script_id=473 and copy it into .vim/plugin/ directory. This plug-in automatically provides us with two mappings: “.c” for commenting code and “.C” for uncommenting code back.
File and buffer browser
 Vim supports editing of several files simultaneously. One can start Vim as “
vim main.pl main2.pl” and then use “:next” and “:previous” to navigate through open files (called “buffers”). It is also possible to open files for editing without quiting Vim every time. For that, one should use simple “:e main2.pl” command, where main2.pl is the name of needed file.
There are, as usual, better (more convenient) ways to work with files and buffers. Vim website lists few plug-ins which can handle only files, or only buffers, or both at the same time. One of those plug-ins is winmanager by Srinath Avadhanula. Let’s grab winmanager from http://www.vim.org/scripts/script.php?script_id=95.
Vim’s winmanager plug-in can make use of bufexplorer plug-in by jeff lanzarotta availalbe from http://www.vim.org/scripts/script.php?script_id=42.
Installation is as usual – saving, unziping, and dos2unixing. Since we don’t want to always have file/directory browser turned on, lets add a mapping line to our .vimrc to “:WMToggle” by F2.
" This is for winmanager
map <F2> :WMToggle<CR>
If you need more information on this topic, read file /usr/share/doc/vim-common-6.1/docs/usr_23.txt.
Tag explorer
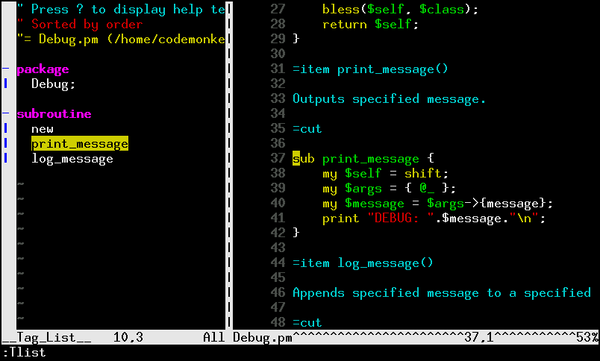 If you ask me, I am almost happy. The last thing that I am missing is something that will ease up my code browsing. I need a fast way of switching between different parts of my code and hierarchical view of it. Once again I go fishing to Vim web site and get myself a nice looking taglist plug-in by Yegappan Lakshmanan from http://www.vim.org/scripts/script.php?script_id=273. This one is not even an archive! You just need to copy it into your
 .vim/plug-in directory. Let’s map “:Tlist” command to F3 key.
" This is for taglist
map <F3> :Tlist<CR>
One annoying thing that I find about taglist is that it resizes the terminal window when possible. I prefer to switch this feature off by add modifying my .vimrc in the following way.
" This is for taglist
let Tlist_Inc_Winwidth = 0
map <F3> :Tlist<CR>
If you need more information on this topic, read file /usr/share/doc/vim-common-6.1/docs/tagsrch.txt.
Perl-Specific Configuration
Embperl syntax highlighting
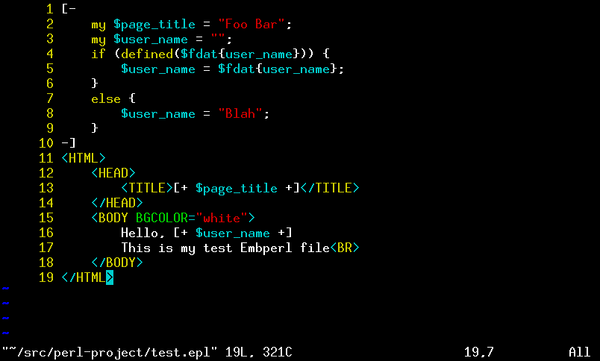 If you use Embperl perl module for developing dynamic content websites, then you will need to download Embperl syntax highlighting plug-in developed by Lukas Zapletal. These steps are similar for setting up highlighting for any other programming language that you might use and which is not supported out of the box.
Embperl syntax highlighting plug-in is located at http://www.vim.org/scripts/script.php?script_id=61. Download it and unzip it in your .vim/ directory. Again, passing all new files through dos2unix is a good idea, if you are on a UNIX/Linux box as I am. vimrc_example shipped with the archive contains the example of configuration that you’ll need to put into your .vimrc.
[codemonkey@gucho .vim]$ ls
colors  colors.zip  Embperl_Syntax.zip
[codemonkey@gucho .vim]$ unzip Embperl_Syntax.zip
Archive:  Embperl_Syntax.zip
  inflating: colors/embperl_yellow.vim
   creating: syntax/
  inflating: syntax/embperl.vim
  inflating: vimrc_example
[codemonkey@gucho .vim]$ cat vimrc_example
"let perl_fold=1
augroup filetypedetect
autocmd! BufNewFile,BufRead *.epl,*.phtml setf embperl
augroup END
autocmd BufNewFile,BufRead *.epl,*.phtml colorscheme embperl_yellow
Embperl color scheme
Embperl syntax highlighting plug-in uses it’s own color scheme, so don’t worry if you see colors different from the ones that you have expected.
Perl syntax compiler
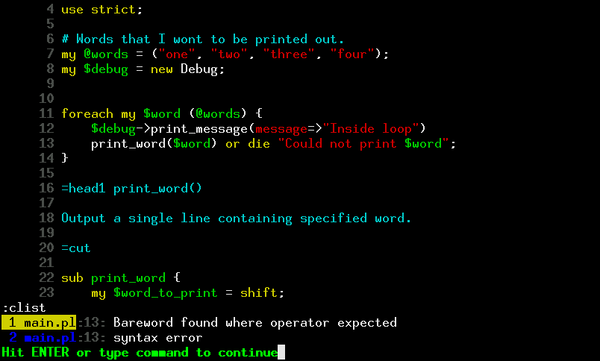 Most of Integrated Development Environments (IDE) try to simplify write-compile-debug cycle. One of the things which can make the cycle easier is automatic cursor positioning to the place in the code where error occurred. Vim can do this for almost any language and compiler. If you know the format that your compiler spits out, then you can configure Vim to parse those errors and position the cursor for you. Since I am not the first Perl developer who uses Vim, I assumed that someone already wrote the compiler error syntax parser (sounds horrifying, isn’t it?).
Let’s once again download it from Vim web site – http://www.vim.org/scripts/script.php?script_id=56. Installation instructions are simple: just copy perl.vim (developed by Lukas Zapletal) into your .vim/compiler/ directory. Now we need to specify for which files we want Vim to use our new perl compiler scripts. This is easily done by adding the following lines to .vimrc.
" Use perl compiler for all *.pl and *.pm files.
autocmd BufNewFile,BufRead *.p? compiler perl
Now you can use “:make” to check your code for errors. If you do have problems in your code, then Vim will position the cursor on the line with the first problem. You can use “:cnext” and “:cprevious” to go through other error messages. “:clist” will show a list of all errors.
If you need more information on this topic, read file /usr/share/doc/vim-common-6.1/docs/usr_30.txt.
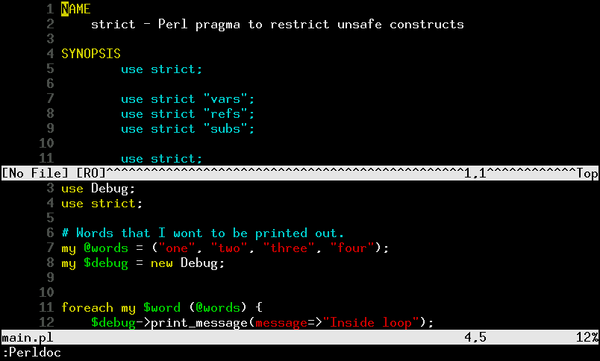
Perldoc integration
 Yet another feature provided in most IDEs is on-line documentation. Vim helps developers even with that. By default, Vim comes with system manual support on all UNIX boxes. This comes very handy when you use system commands in your scripts and need to check command line parameters. Just position the cursor on the word that you are interested in and press
 K. Vim will execute “man word“, where “word” is the word under the cursor. This is helpful but not as much as we need it.
Let’s visit Vim site again and download Perldoc plug-in (developed by Colin Keith) from http://www.vim.org/scripts/script.php?script_id=209. unzip perldoc.zip and run all extracted files through dos2unix. It’s a good idea to add a F1 mapping to “:Perldoc” in your .vimrc.
" This is for perldoc.vim
autocmd BufNewFile,BufRead *.p? map <F1> :Perldoc<cword><CR>
autocmd BufNewFile,BufRead *.p? setf perl
autocmd BufNewFile,BufRead *.p? let g:perldoc_program='/usr/bin/perldoc'
autocmd BufNewFile,BufRead *.p? source /home/codemonkey/.vim/ftplugin/perl_doc.vim
If you are using a newer version then I do, then you skip the last line.
Now, whenever you hit F1 while in the perl file, “:Perldoc” will get executed for the word that you have under the cursor, your current window will split horizontally and you’ll see appropriate perldoc page.
After installation of this plug-in I have noticed that syntax highlighting in few of my programs broke. After a quick look, I understood that that happened because of my extensive usage of underscore (“_”) character in procedure names. I had to fix it by simply adding underscore (“_”) character to the list of keyword characters on line 14 in file .vim/ftplugin/perl_doc.vim.
" Adds / and . as used in requires.
" setlocal iskeyword=a-z,A-Z,48-57,:,/,.
" Adds / and . as used in requires. Also adds _ as used in procedure names.
setlocal iskeyword=a-z,A-Z,48-57,:,/,.,_
Conclusion
As can easily be seen above, Vim is a powerful and flexible text editor with a lot of features that can be easily added to the default distribution. Vim website contains much more plug-ins than I have demonstrated. Some of those plug-ins provided alternative solutions for the needs showed in this document.
If you will ever again feel that something is missing while using Vim, or if you would just think that there might be an easier and/or faster way to do so, then browse through Tips and Scripts on Vim web site and ask for help in the mailing list.
:wq
You need PerlTidy!
http://perltidy.sourceforge.net/
It reformats your file according to various flags & switches.
It also allows you to set up your own flags, so I have the following in my ~/.perltidyrc
team { -gnu -csc }
ian { -pbp -nst -csc -i=2 }
I then reformat whatever file I’ve opened to my preferred format with
:!perltidy -ian -n %
having coded and tested and got it ready to commit to the central repository, I reformat with:
;!perltidy -team -b %
…. and then the file can be submitted to the team code repository, formatted in the preferred team way.
Thanks for share, do you a new update?
I’ve been planning to write an update for a few years now. And maybe I will. It’s just that these days I’m not working with Perl a lot. :)