Exporting messages from Gmail with fetchmail and procmail

One of the projects that I am involved in has a requirement of importing all the historical emails from a number of Gmail accounts into another system.  It’s not the most challenging of tasks, but since I spent a bit of time on it, I figured I should blog it here too, just in case a similar need will arise in the future.

In my particular case, I need two different solutions.  One for exporting all of the messages from all folders of all Gmail accounts in question (Gmail for Work).  And the other is for exporting only the messages from the “Sent Mail” folder, which were sent on specific dates.

The solution that I derived is based on the classic tools for this purpose – fetchmail and procmail.  Fetchmail is awesome at fetching emails using all kinds of protocols.  Procmail is amazing at sorting, filtering, and otherwise processing the email messages.

So, here we go.  First of all, we need to tell fetchmail where to get the messages from.  I didn’t want to create to separate configurations for each of my tasks, so I left only the options common between them in the configuration file, and the rest I will be passing as command line arguments, depending on scenario.

Note that I’ve been running these tests from a dedicated environment, where I only had the root user.  You don’t have to run it as root – it’ll work as any other just fine.  Also, keep in mind that I used “/root/fetchmail-test/” folder for my test runs.  You might need to adjust the paths if you have it any different.

Here’s my fetchmail.rc file, which I used to test a single mailbox.  A new “poll” section will go into this file later, for each mailbox that I’ll need to export.

poll imap.gmail.com proto imap:
username "someuser@gmail.com" is root here
password "somepass"
fetchall
keep
ssl

If you are not root, you might need to adjust the second line, replacing “root” with your username. Also, for testing purposes, you can use “fetchlimit 1” instead of “fetchall“.

Now, we need two configuration files for procmail.  The first one is super simple – I’ll use this for simply pushing all downloaded messages into a single giant mbox file.  Here’s the procmail-all.rc:

VERBOSE=0
DEFAULT=/root/fetchmail-test/fetchmail.all.mbox

As you can see, it only defines the verbosity level and the default mailbox.  The second configuration file is a bit more complicated.  I’ll use it for the sent items only.  The sent items folder limit will be done with fetchmail.  But I want to do further is disregard all messages, which were not sent on a specific date.  Here is my procmail-sent.rc:

VERBOSE=0
DEFAULT=/dev/null
:0
* ^Date: .*28 Jul 2016.*|\
^Date: .*27 Jul 2016.*
/root/fetchmail-test/fetchmail.sent.mbox

Again, we have the verbosity level and the default mailbox to save messages to.  Since I want to disregard them unless they match a certain condition, I specify /dev/null.   Then, I specify my condition, which is simply a bunch of regular expressions for the Date header.  Usually, Date header is a not very reliable as different MUAs (Mail User Agents) use different formats, time zones, etc.  In this particular case test results seemed consistent (maybe Gmail fixes the header), and I didn’t have any other more reliable criteria to use.

As you can see, I use a very basic condition for date matching. So, if the Date header matches either “28 Jul 2016” or “27 Jul 2016“, the message is saved in the mbox file, rather than being thrown into the default mailbox.

Now, all I need is a way to tie fetchmail and procmail together, as well as provide some additional options.  For that I created the two one-liner shell scripts, just so that I won’t need to figure out the command line arguments if I look at this whole thing six month later.

Here is the check-all.sh script (multi-line for readability):

#!/bin/bash
fetchmail -f fetchmail.rc \
-r "[Gmail]/All Mail" \
--mda "procmail /root/fetchmail-test/procmail-all.rc"

and here is the check-sent.sh script (multi-line for readability):

#!/bin/bash
fetchmail -f fetchmail.rc \
-r "[Gmail]/Sent Mail" \
--mda "procmail /root/fetchmail-test/procmail-sent.rc"

If you run either one of these scripts, you’ll see the output similar to this:

$ ./check-all.sh
fetchmail: WARNING: Running as root is discouraged.
410 messages for someuser@gmail.comat imap.gmail.com (folder [Gmail]/All Mail).
reading message someuser@gmail.com@gmail-imap.l.google.com:1 of 410 (446 header octets) (222 body octets) not flushed
reading message someuser@gmail.com@gmail-imap.l.google.com:2 of 410 (869 header octets) (230 body octets) not flushed
reading message someuser@gmail.com@gmail-imap.l.google.com:3 of 410 (865 header octets) (230 body octets) not flushed
...

Here are a few resources that you might find helpful:

Why I left my new MacBook for a $250 Chromebook

Why I left my new MacBook for a $250 Chromebook” is a nice write up of a new Chromebook user.  Even though I don’t own a MacBook (or any Mac products for that matter), I have been considering a Chromebook for a while now too.

My biggest concern is obviously programming and system administration tools – editors, terminals, remote access, etc.  But it’s getting there.

Apart from the experiences and wishlists, I found these two links useful:

How to Recover an Unreachable EC2 Linux Instance

volume

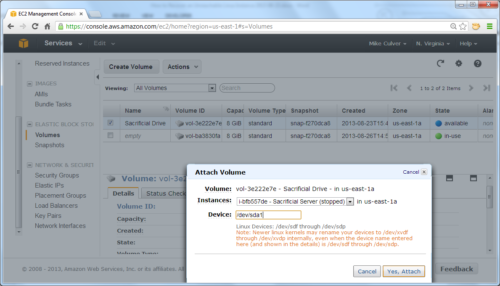
Here is a tutorial that will come handy one day, in the moment of panic – How to Recover an Unreachable Linux Instance. It has plenty of screenshots and shows each step in detail.

TL;DR version:

  1. Start a new instance (or pick one from the existing ones).
  2. Stop the broken instance.
  3. Detach the volume from the broken instance.
  4. Attach the volume to the new/existing instance as additional disk.
  5. Troubleshoot and fix the problem.
  6. Detach the volume from the new/existing instance.
  7. Attach the volume to the broken instance.
  8. Start the new instance.
  9. Get rid of the useless new instance, if you didn’t reuse the existing one for the troubleshooting and fixing process.
  10. ???
  11. PROFIT!

SSH multiplexing and Ansible via bastion host

It never ceases to amaze me how even after years and years of working with some technologies I keep finding out about super useful features in those technologies, that could have saved me lots of time if I knew about them earlier.  Today was a day just like that.

I was working on the Ansible setup for a new hosting environment.  One particular thing I wanted to utilize more was a bastion host – a single Linux machine with exposed secure shell (SSH) port, which will be used for managing the configurations of all the servers within the environment.  I sort of done that before, but the solution wasn’t as elegant as I wanted it to be.

So, I came across this article – Running Ansible Through an SSH Bastion Host.  Which, among other things taught me about a feature that I didn’t know nothing about.  Literally.  Haven’t even heard about it.  Multiplexing in OpenSSH:

Multiplexing is the ability to send more than one signal over a single line or connection. With multiplexing, OpenSSH can re-use an existing TCP connection for multiple concurrent SSH sessions rather than creating a new one each time.

This doesn’t sound too useful for when you are working in command line, one server at a time.  Who cares how many TCP connections do you need? It’ll be one, or two, or five.  Ten, if you are really involved.  But by that time you’ll probably be running background processes, and screen or tmux (which are apparently called “terminal multiplexers“).

It’s when you are going deeper into automation, such as in my case with Ansible, when you’ll need OpenSSH multiplexing.  Ansible, being a configuration manager, can run a whole lot of commands one after another.  It can run them on multiple servers in parallel as well.  That’s where reusing the connections can make quite a bit of a difference.  If every command you run connects to the remote server, executes, and then disconnects, you can benefit from not needing to connect and disconnect multiple times (tens or hundreds of times, every playbook run).   Reusing connection for parallel jobs is even better – and that’s a case with bastion host, for example.

Here are a few useful links from that article, just in case the ether eats it one day:

Armed with those, I had my setup running in no time.  The only minor correction I had to do for my case was the SSH configuration for the bastion host.  The example in the article is NOT wrong:

Host 10.10.10.*
  ProxyCommand ssh -W %h:%p bastion.example.com
  IdentityFile ~/.ssh/private_key.pem

Host bastion.example.com
  Hostname bastion.example.com
  User ubuntu
  IdentityFile ~/.ssh/private_key.pem
  ForwardAgent yes
  ControlMaster auto
  ControlPath ~/.ssh/ansible-%r@%h:%p
  ControlPersist 5m

It’s just that in my case, I use hostnames both for the bastion host and the hosts which are managed through it.  So I had to adjust it as so:

Host *.example.com !bastion.example.com
  ProxyCommand ssh -W %h:%p bastion.example.com
  IdentityFile ~/.ssh/private_key.pem

Host bastion.example.com
  Hostname bastion.example.com
  User ubuntu
  IdentityFile ~/.ssh/private_key.pem
  ForwardAgent yes
  ControlMaster auto
  ControlPath ~/.ssh/ansible-%r@%h:%p
  ControlPersist 5m

Notice the two changes:

  1. Switch of the first block from IP addresses to host names, with a mask.
  2. Negation of the bastion host configuration.

The reason for the second change is that if there are multiple Host matches in the configuration file, OpenSSH will combine all options from the matched configurations (something I didn’t find in the ssh_config manual).  Try this example ssh.conf with some real hosts of yours:

Host bastion.example.com
	User someuser

Host *.example.com
	Port 2222

You’ll see the output similar to this:

$ ssh -F ssh.conf bastion.example.com -v
OpenSSH_7.2p2, OpenSSL 1.0.2h-fips  3 May 2016
debug1: Reading configuration data ssh.conf
debug1: ssh.conf line 1: Applying options for bastion.example.com
debug1: ssh.conf line 4: Applying options for *.example.com
debug1: Connecting to bastion.example.com [1.2.3.4] port 2222.
^C

Once you negate the bastion host from the wildcard configuration, everything works as expected.

You might also try using “%r@%h:%p” for the socket to be different for each remote username that you will concurrently connect with, but that’s just nit-picking.

Packer – a tool for creating VM and container images

With the recent explosion in the virtualization and container technologies, one is often left disoriented.  Questions like “should I use virtual machines or containers?”, “which technology should I use”, and “can I migrate from one to another later?” are just some of those that will need answering.

Here is an open source tool that helps to avoid a few of those questions – Packer (by HashiCorp):

Packer is a tool for creating machine and container images for multiple platforms from a single source configuration.

Have a look at the supported platforms:

  • Amazon EC2 (AMI). Both EBS-backed and instance-store AMIs within EC2, optionally distributed to multiple regions.
  • DigitalOcean. Snapshots for DigitalOcean that can be used to start a pre-configured DigitalOcean instance of any size.
  • Docker. Snapshots for Docker that can be used to start a pre-configured Docker instance.
  • Google Compute Engine. Snapshots for Google Compute Engine that can be used to start a pre-configured Google Compute Engine instance.
  • OpenStack. Images for OpenStack that can be used to start pre-configured OpenStack servers.
  • Parallels (PVM). Exported virtual machines for Parallels, including virtual machine metadata such as RAM, CPUs, etc. These virtual machines are portable and can be started on any platform Parallels runs on.
  • QEMU. Images for KVM or Xen that can be used to start pre-configured KVM or Xen instances.
  • VirtualBox (OVF). Exported virtual machines for VirtualBox, including virtual machine metadata such as RAM, CPUs, etc. These virtual machines are portable and can be started on any platform VirtualBox runs on.
  • VMware (VMX). Exported virtual machines for VMware that can be run within any desktop products such as Fusion, Player, or Workstation, as well as server products such as vSphere.

The only question remaining now, it seems, is “why wouldn’t you use it?”. :)